![]()
I haven’t posted for a while so I thought I’d put finger to keyboard to show some of what I’ve been up to these last few weeks.
Last year I started a job as a part-time upholsterer, and I wanted to put my stamp on my working area, in the form of a few tools and toolboxes. Also, I have recently design myself a new logo, and I was desperate to showcase it on something.
So, in between work and family life, I’ve put in a few hours in the workshop recently, in order to address both these issues. This is what I came up with.
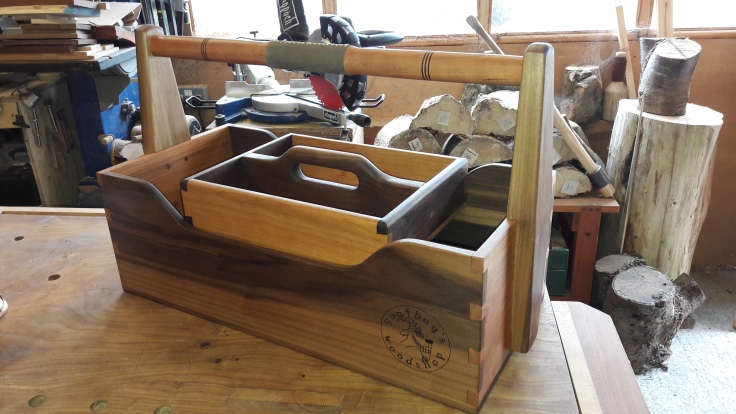
First off was a toolbox, to replace the ubiquitous plastic affair that can be found on the shelves at any DIY store. I decided to go with the design I came up with a few months ago, but this time using walnut and cherry.

Here you can see all the components milled, shaped and sanded, and all the joinery complete. Just a bit of pyrography, brass and leather work needed and then three coats of my oil/varnish/turps blend.
Next was a small lidded box. My new job involves a little hand and machine sewing, so I decided to make a receptacle for pins, chalks, awls, scissors and the like.

Here are the components all ready to assemble. For this project I went with utile and maple., brass hinges and catch, and pyrography of a needle and thread on the lid.

The box was finished with shellac and wax and I lined the inside with leather. I even made a small pincushion for the inside as well.

As I have said before, every good workshop needs a good mallet, and the one that I currently use at work is perfectly fine, but a little boring and care worn.

My new mallet is made from beech and ash, with pyrography of the goat’s head part of my logo, and finished with oil/varnish.

Occasionally, when refinishing an armchair say, new webbing needs to be affixed to the underside to support the bottom. It is very important that the webbing be taut, and there are various tools available to achieve this. The ones we use at work consist of a paddle and a dowel. A loop of the webbing is passed through a hole in the paddle and secured with the dowel and then the using the paddle as a lever, the webbing is stretched tight and fixed with tacks or staples. (This site will explain properly)

I didn’t really need to make on of these because there are several available to use at work, but I thought it would be a fun exercise. Taking careful measurements I made a rough sketch at work and used this to make my own. The paddle is oak and the dowel is purpleheart. The dowel is tethered with brass plugs and leather.

Finally, I made a pen tidy. Last year, across the road from me, a blackthorn blew down in the wind. It was mostly rotten, but I managed to salvage a few chunks and it has been drying in the shop ever since.

Using a chunk of this blackthorn I turned a hollow cylinder and then parted down the mid section until it resembled a cotton reel. Some string wound round it, and a needle turned from kingwood, and the cotton reel pen tidy was complete. The exposed wooden parts were finished with Hampshire Sheen.

Well, there you have it. Now that I look at it all, I think I may have gone a bit over the top? What do you reckon?

Nah….balls to it. I had fun making them.


You may been out for a while… but what a return!!
I wish you lots of inspiration in your new path!
LikeLike
Cheers
LikeLike
Welcome back, its been a while 🙂
Over the top? Nah, it just shows your pride of workmanship, well done!
Bob
LikeLiked by 1 person
Thanks Robert
LikeLike
Good stuff, I like all of it
LikeLiked by 1 person
You have done more than a few things I should have already done regarding tool storage- and set a nice high bar to boot! Looks great.
LikeLiked by 1 person
Cheers Gav
LikeLike