Well, 2016 is about to bow out, and so I thought I’d put together a little slideshow of what I have been up to this year.
Now I’m off to raise a glass of the particular and usher in 2017.
Happy New Year folks! Let’s make it a good one.
gb

Well, 2016 is about to bow out, and so I thought I’d put together a little slideshow of what I have been up to this year.
Now I’m off to raise a glass of the particular and usher in 2017.
Happy New Year folks! Let’s make it a good one.
gb


The glue up for this project was a long drawn out process. I had to break out all my clamps, even the homemade ones. The first glue up was the main tool box and the tray. Continue reading “Tool Tote #3: The big finish”


As I mentioned in my last post, the dry fit of the toolbox seemed to be missing something. Eventually, I decided that it needed a lift-out tray. Just a small one, not one that went the entire length of the box, but a little one that could slide back and forth on runners so that items could be retrieved from the box even with the tray in place. Continue reading “Tool Tote #2: A tote within a tote”

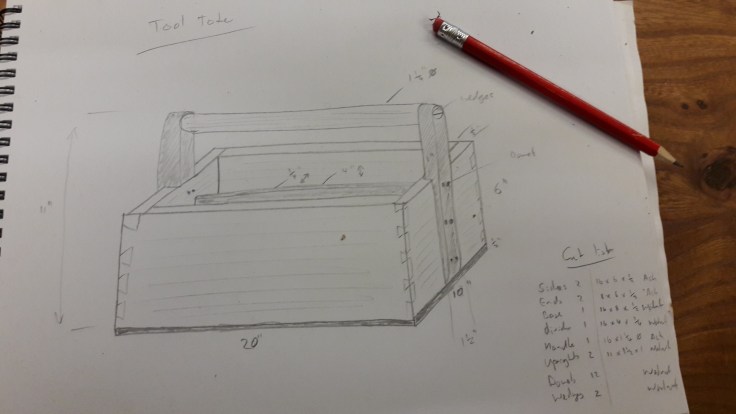
Following on from the last project, yet another commission came my way from the self-same chap who commissioned the Biltong Slicer, the Treasure Chest, and the Jewelry Box. This time it was a gift for his son and my remit was virtually non-existent – carte blanche you might say. In the end I settled upon a tool tote, because I know that the lad enjoys dirt bike racing, and would need a stout receptacle in which to store spanners and sockets and pliers and such. Continue reading “Tool Tote #1: The tool box”


To finish things up with the jewelry box, I fitted the hinges and put my maker’s mark on the base so that I could apply the finish to the outside of the box. Continue reading “Jewelry Box #3: Finishing touches”
