
I haven’t posted for a long time so I thought I’d better remedy that. I have been away on holiday for a couple of weeks (no prize guessing where if you look at my twitter feed), and since I have been back I have been working on the boat bookcase.
I had clamped the side pieces back in the form while I was away so that they didn’t have a chance to spring back. Nevertheless, one piece seemed to have bent more than the other but there was not much I could do about that. I just had to get a bit creative when assembly time arrived, but I’ll get to that later.

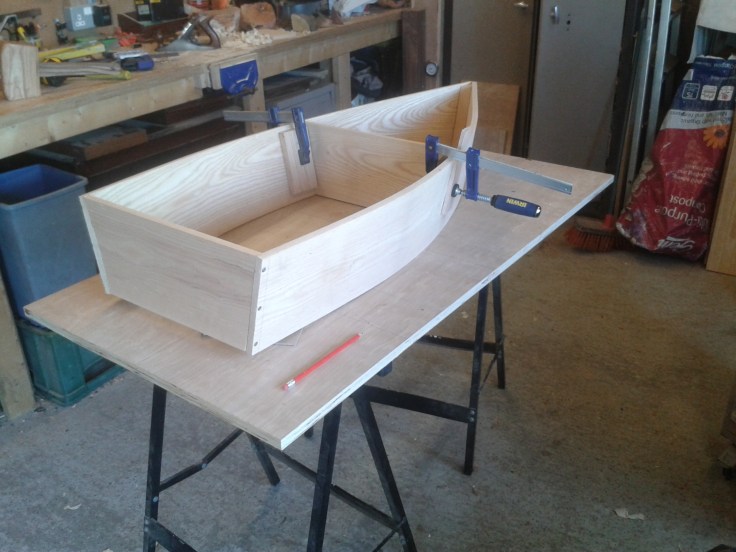
I began by mitring the top of the side pieces so that they meet at an angle at the bow to give a more authentic look. This has two side effects: 1. The back of the bookcase (or the bottom of the boat, depending on how you look at it) is narrower than the front (top). This can be seen clearly if you look at the base of the boat in the picture above. 2. Both the front and the back of the bookcase are slightly curved, the front concave and the back convex. Happily, these effects also give a more authentic feel to the piece.
I made an angled wooden block for the bow pieces to attach to, two shelves and a base, and I screwed them all together for the time being. I didn’t want the screws to be visible in the final piece, but as there was a lot of taking apart and putting back together to be done, screws were the best option until final assembly.
 I decided to stain the interior before assembly to make sure that there were no signs of the natural colour should the wood move later.
 With the frame stained and assembled I moved onto the back panels, which involved more steam bending and more staining. Once the back panels were attached and clamped in place I replaced all the screws that would be visible with glued dowels.


Once the glue had dried, I cut the dowels flush and planed the base flush with the sides. Then there was a deal of sanding to be done before applying the stain to the exterior.
At this stage my patron paid me a visit and seemed very pleased with the project so far even tough at that stage there was a deal of tarting up to be done.
That will have to wait for another post. Watch this space…


It seems… I read one or two post from Chris Schwarz… 😛 (that coffin shape book shelf)
Just kidding I now it was a commission
That boat/shelf just looks great!
I believe you used an “old wallpaper stripper” for the steamer. Can you write a bit more around your experience (the do’s and dont’s) about it?
Thanks
LikeLike
Cheers. I’ll try to remember to talk more about the steaming process in the next post.
LikeLike