
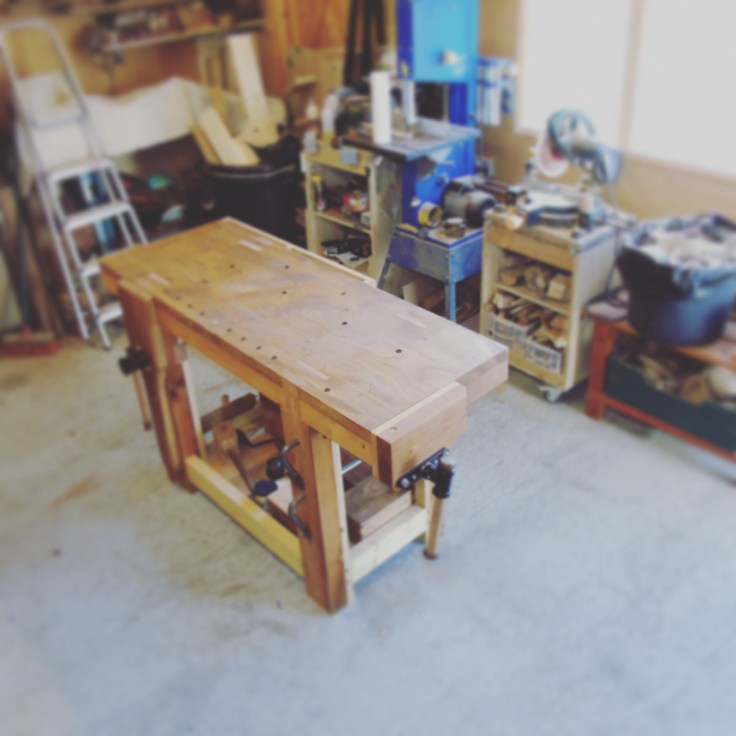
It’s time to sign off on another project at Goatboy’s Woodshop – I declare the workbench finished!
This, the final post in this series, will be a bit picture heavy because there’s not really much else to say.


The last post ended with me applying the oil/varnish to the leg vice assembly, but once that was installed there were still a number of little details to finish up. The parallel guide needed a pin for it to work properly so I quickly turned one from a chunk of camellia. I rounded the tip of a length of brass rod and epoxied it into the handle.


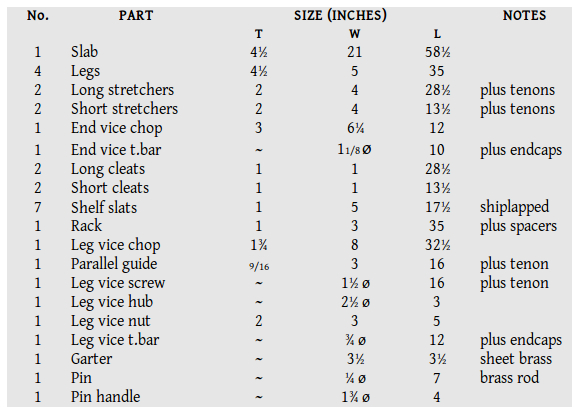
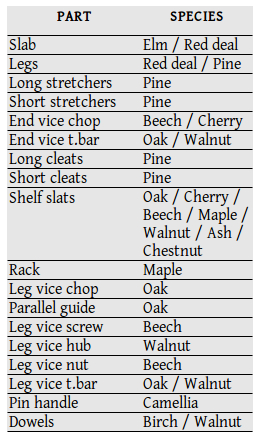
I put together a cut list for the project in case anyone is interested. I have shown the final dimensions here but, as I have said in previous posts, a number of the parts are laminated from smaller sized stock.
I put my brand on the handle of the pin, to match the one on the bench itself. I branded the bench before applying the oil, but I can’t remember if I included it in a previous post, so here it is:


The bench and accessories are constructed from no less than 12 species of wood. This gives it a quirky ‘patchwork’ sort of look, which is the result of necessity rather than design, but I rather like it.
It might be a bit of an ugly duckling, but it’s my ugly duckling.
I’ve put all of my go-to toolboxes (chisels, augers, layout tools etc) on the shelf so that they are handy. When I am working, most of them can sit in the rack, but between projects, back onto the shelf they will go. I’ll still keep my saws and planes in the tool cabinet though, because they’ll be better protected from rust in there than out in the open.


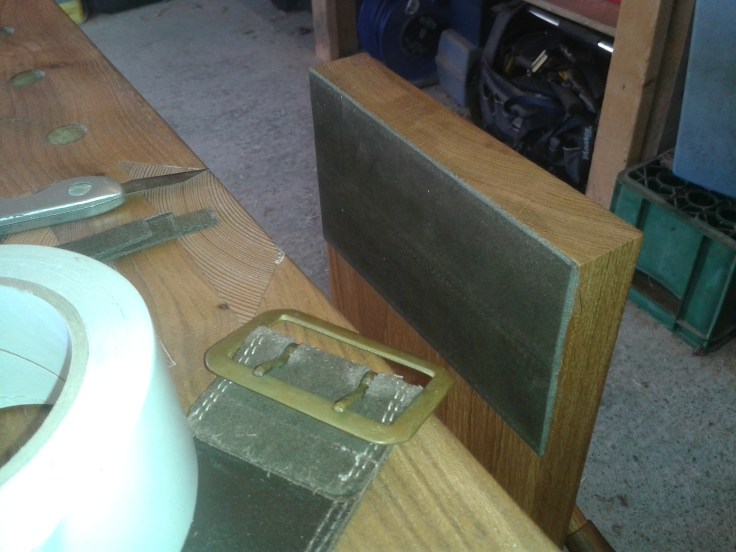
I tested out the leg vice to dimension some wood for one of my next projects, and I found that the wood slipped a little bit. I picked up a secondhand leather belt at a car boot sale recently and I’ve used it to line one of the faces – problem solved.
I thought I’d put together a little slideshow of the construction, as a reminder of the various stages involved.
This project has been a real learning curve – stressful and annoying at times, but very enjoyable in the main, and I’d recommend building one of these benches to any handtool woodworker.
And that, as they say, is that.
It’s been emotional.
gb


I Like it!!!! Enjoy and use it for many years!
🙂
LikeLiked by 1 person
Thanks Coisas.
LikeLike
Is it possible to please receive the plans at my E-Mail address.
LikeLike
I’m afraid I don’t think I can. The only plans I have are in a book by Christopher Schwarz. Nothing on the computer sadly. Sorry.
LikeLike
I’ve just had word that plans for this build will be available soon. Tim Davis, a mechanical and architectural draftsman, has offered to draw them up and post them on his site, so watch this space….
http://mechanicaldrawing.us/index.php/2016/09/29/goatboys-woodworking-bench/
LikeLike
Well done, GB. It was great to follow this build. I built my own bench last year, so it might be a while before I build another. But yours has so many great ideas.
LikeLike
Cheers Matt. I must point out that most of the ideas are not my own, but thanks all the same.
LikeLike